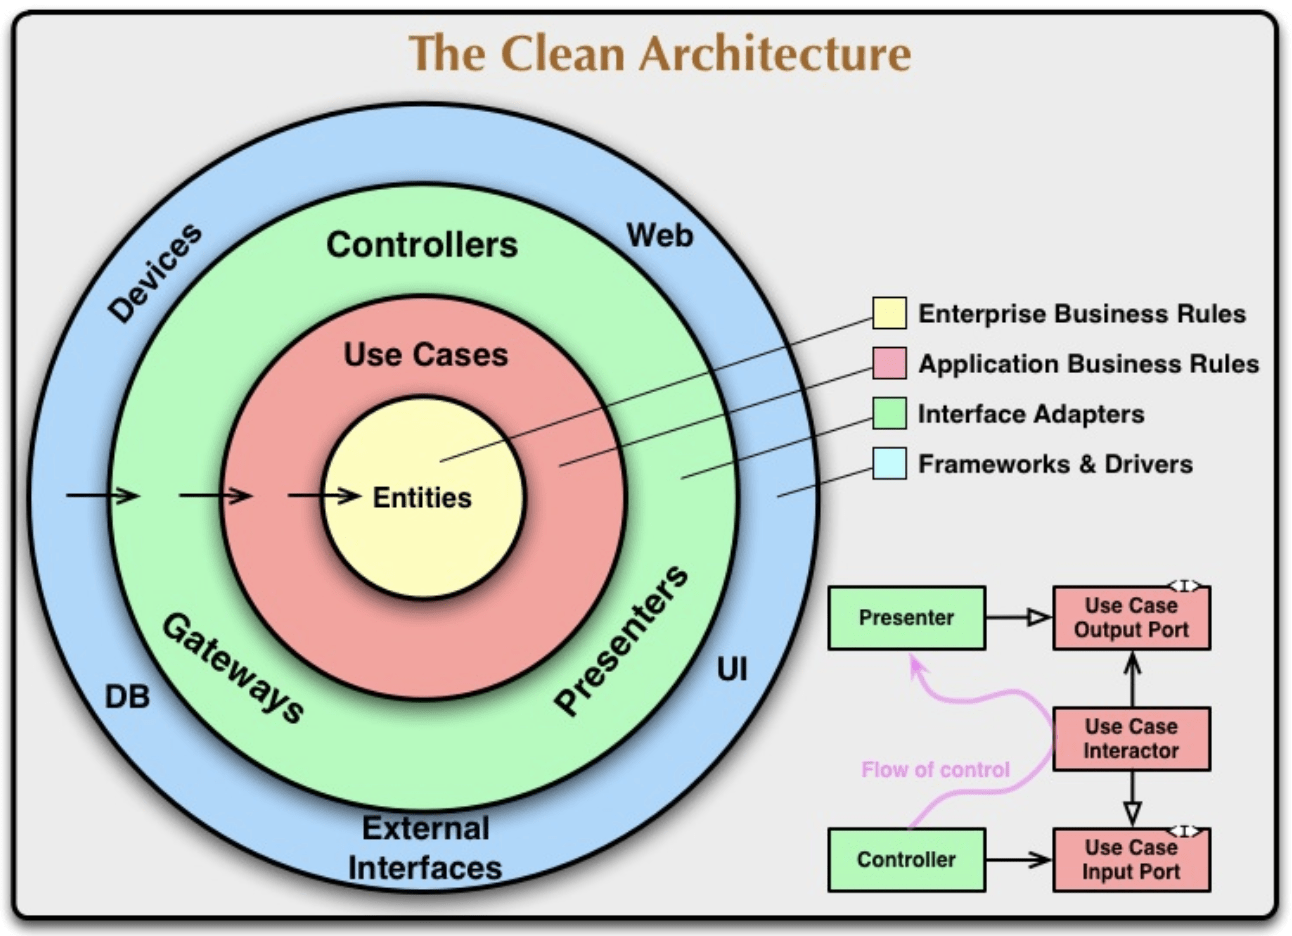
Clean Architecture介绍

Clean Architecture(简称CA)是一种软件架构设计思想,旨在解决软件系统的可维护性、可测试性、可扩展性等问题。CA的核心思想是:将应用程序分为不同的层,每个层都有自己的职责和依赖规则,层与层之间通过接口进行通信,依赖关系保持单向。这样做的好处是,系统的不同部分之间松耦合,易于维护和扩展,也方便进行单元测试和集成测试。
CA的基本结构通常由以下几个部分组成:
实体(Entity):代表系统的核心概念和业务规则,包括属性和行为,是应用程序中最重要的部分,应该是独立于任何其他部分的。
用例(Use Case):描述了系统的功能和行为,是与用户交互的部分,负责调用实体和协调其他部分的工作流程。
接口适配器(Interface Adapter):负责将用例和实体连接到外部系统和用户接口,包括控制器、门户网站、命令行接口等。
框架和驱动程序(Framework & Drivers):负责连接整个系统的外部环境,包括数据库、web框架、消息队列等。
CA的一个重要特点是,每个部分都只依赖于比自己低一层的部分,避免了高层部分直接依赖于低层部分的情况。这种结构使得系统的各个部分都能独立演化,不会产生副作用,也能避免由于依赖关系的变化而导致的系统崩溃。
CA的思想并不是最近才出现的,它最早是由Robert C. Martin在他的文章《The Clean Architecture》中提出的。它已经被广泛应用于许多大型项目和企业,如Android应用程序、Java EE应用程序、Node.js应用程序等。在现代Web应用程序开发中,使用CA进行开发已经成为了一种趋势。
Entity业务实体层
上面介绍中可以知道,大概分为4层,但是我们使用NestJS一般作为后端API使用,在实际开发过程中,我喜欢把项目分为三层,现在先介绍Entity业务实体层。
在 Clean Architecture 中,Entity 实体层是系统的核心,它包含了业务逻辑和状态,是系统的基础构建块。Entity 实体层通常是与业务逻辑密切相关的部分,负责处理业务领域内的问题。Entity 实体层不依赖于外部系统,也不涉及到和数据库交互的操作,其目的是将业务逻辑和状态信息独立于技术实现,从而更加关注业务需求,提高代码的可维护性和可测试性。
在实现 Entity 实体层时,通常会使用面向对象的思想,将业务领域内的概念抽象成实体对象,并封装相关的属性和方法。Entity 实体对象通常是具有唯一标识符的对象,比如说一个用户对象、一个订单对象、一个商品对象等等。这些实体对象可以彼此之间关联,形成复杂的业务对象结构。
Entity 实体层应该只包含与业务逻辑相关的代码,不应该包含任何技术实现相关的代码,比如说与数据库、缓存、消息队列等的交互。这样可以使得业务逻辑和技术实现独立,有利于测试、修改和维护。同时,Entity 实体层的代码应该具有高内聚、低耦合的特点,方便代码重用和扩展。
在 NestJS 中,可以通过定义类来实现 Entity 实体层,通常在类中定义实体对象的属性和方法。下面是一个简单的示例:
export class UserEntity {
  constructor(
    public readonly id: number,
    public readonly name: string,
    public readonly email: string,
    public readonly password: string,
  ) {}

  public async verifyPassword(password: string): Promise<boolean> {
    // 验证密码的逻辑
  }

  public async updateName(name: string): Promise<void> {
    // 更新用户名的逻辑
  }
}
export class UserEntity {
constructor(
public readonly id: number,
public readonly name: string,
public readonly email: string,
public readonly password: string,
) {}
public async verifyPassword(password: string): Promise<boolean> {
// 验证密码的逻辑
}
public async updateName(name: string): Promise<void> {
// 更新用户名的逻辑
}
}在上面的示例中,我们定义了一个 UserEntity 类,它包含了用户的基本属性和一些相关的方法。这里的属性和方法都是与业务逻辑相关的,不涉及到具体的技术实现。同时,我们也没有和任何数据库或者其他技术实现相关的代码。这样,我们就可以在这个 Entity 实体层上,编写和测试业务逻辑,而不用考虑具体的技术实现。
Use Case业务逻辑层
在 Clean Architecture 中,Use Case 层被定义为业务逻辑和用例流程的实现。它是应用程序的核心,负责实现具体的业务规则和操作。Use Case 层通常是与其他层分离的,并通过接口与框架和驱动程序交互。
在 NestJS 中,我们可以将 Use Case 层实现为 service 或者 provider。它们负责对 domain 层的 entities 进行操作,并在需要时调用其它 service 或 provider 实现特定的 Use Case。
下面是一个示例 Use Case 实现:
import { Injectable } from '@nestjs/common';
import { InjectRepository } from '@nestjs/typeorm';
import { Repository } from 'typeorm';
import { Post } from '../entities/post.entity';

@Injectable()
export class GetPostByIdUseCase {
  constructor(
    @InjectRepository(Post)
    private readonly postRepository: Repository<Post>,
  ) {}

  async execute(postId: string): Promise<Post> {
    const post = await this.postRepository.findOne(postId);
    if (!post) {
      throw new Error('Post not found');
    }
    return post;
  }
}
import { Injectable } from '@nestjs/common';
import { InjectRepository } from '@nestjs/typeorm';
import { Repository } from 'typeorm';
import { Post } from '../entities/post.entity';
@Injectable()
export class GetPostByIdUseCase {
constructor(
@InjectRepository(Post)
private readonly postRepository: Repository<Post>,
) {}
async execute(postId: string): Promise<Post> {
const post = await this.postRepository.findOne(postId);
if (!post) {
throw new Error('Post not found');
}
return post;
}
}在上面的示例中,我们定义了一个名为 GetPostByIdUseCase 的 Use Case。它接收一个 postId 参数,并返回对应的 Post 实体。我们使用了 TypeORM 库来访问数据库,并在 constructor 中使用 @InjectRepository() 装饰器来注入 Post 实体的 Repository 对象。
在 execute() 方法中,我们使用 findOne() 方法从数据库中获取对应的 Post 实体,并根据情况抛出异常。这个 Use Case 实现只是一个简单的示例,我们可以根据实际需求添加更多的业务逻辑和操作。
需要注意的是,这个 Use Case 实现是与框架和驱动程序无关的,它只依赖于 domain 层的 entities 和 Repository 对象,可以方便地进行单元测试和模拟。
Infrastructure具体实现层
在 Clean Architecture 中,infrastructure 层负责实现具体的技术细节,例如数据库访问、API 调用、第三方库的使用等。
在 NestJS 中,infrastructure 层通常由以下部分组成:
数据库:Mongoose、TypeORM 等
缓存:Redis、Memcached 等
消息队列:RabbitMQ、Kafka 等
API 接口:Express、Fastify 等
这些技术细节的实现,应该尽可能地与系统其他部分分离,保持单一职责,以便随时更换或升级底层技术实现。
以下是一个使用 Mongoose 实现数据持久化的示例:
import { Injectable } from '@nestjs/common';
import { InjectModel } from '@nestjs/mongoose';
import { Model } from 'mongoose';
import { User } from './user.entity';

@Injectable()
export class UserRepository {
  constructor(
    @InjectModel(User.name) private readonly userModel: Model<User>,
  ) {}

  async create(user: User): Promise<User> {
    const createdUser = new this.userModel(user);
    return createdUser.save();
  }

  async findOneByEmail(email: string): Promise<User | null> {
    return this.userModel.findOne({ email }).exec();
  }
}
import { Injectable } from '@nestjs/common';
import { InjectModel } from '@nestjs/mongoose';
import { Model } from 'mongoose';
import { User } from './user.entity';
@Injectable()
export class UserRepository {
constructor(
@InjectModel(User.name) private readonly userModel: Model<User>,
) {}
async create(user: User): Promise<User> {
const createdUser = new this.userModel(user);
return createdUser.save();
}
async findOneByEmail(email: string): Promise<User | null> {
return this.userModel.findOne({ email }).exec();
}
}在该示例中,我们使用 Mongoose 提供的 Model 对象来访问 MongoDB 数据库。UserRepository 作为数据访问的一个门面(Facade),提供了对外的操作接口,而具体的数据库访问细节则被封装在了该类内部。
这样的设计可以让我们在需要更换数据库实现时,只需要更改 UserRepository 类的内部实现即可,而不会影响到其他层次的代码。
结束语
这篇文章大部分内容由ChatGPT生成,我感觉并不是很严谨,会再写一篇文章,用实例代码讲解Clean Architecture在NestJS中的实现。
 Hello Yu